• Log in
  • Cart (0)
  • Checkout
  • About Us
  • Baking Kits 
    • beginner friendly
    • challenge yourself
    • cream puffs
    • chocoholics
    • kopi & teh
    • no-bake
    • nutty party
  • Tarts In Bloom!
  • contact us
  • About Us
  • Baking Kits 
    • beginner friendly
    • challenge yourself
    • cream puffs
    • chocoholics
    • kopi & teh
    • no-bake
    • nutty party
  • Tarts In Bloom!
  • contact us

Recipes

Soft & Thick White Chocolate, Cranberry & Strawberry NY Cookies

December 27, 2022

We all have different preferences when it comes to eating cookies. Some prefer small and crunchy cookies, while others find thick and chewy cookies more appealing.

If you are one of those who love big, chunky, soft, and cake-like cookies, then you should try our White Chocolate, Cranberry & Strawberry NY Cookies recipe inspired by the famous Levain-bakery! [Go straight to recipe]

While the NY stands for New York here, these will be an absolute hit at your New Year's gatherings.

What Are Levain Cookies?

Levain Bakery isn’t an unfamiliar name for cookie enthusiasts.

The iconic Levain cookies can be found in any branch of Levain Bakery in the States, but if you’re like us and are in a place without access to it, the next best thing is to recreate a version that reminds us of it.

Since its emergence in 1995, Levain cookies have become an iconic NYC signature that has stolen the hearts of many locals and visitors alike.

People around the world have always tried to create their own Levain style cookies: huge New York-style cookies that are almost palm-sized with a crisp outside and a soft and chewy inside.

Here, we've made a version with some dried cranberries and freeze-dried strawberries to give it a sort of tang that complements the sweetness in the cookie.

Read More: Umami White Chocolate Miso Japanese Cookies

Mix In Anything You Want!

If you’ve been googling for Levain cookie recipes, you may find that most of them are soft-baked cookies loaded up with chocolate or white chocolate chips. But hey, no one can stop you from tweaking the recipe to your liking!

There are no limitations when it comes to adding mix-ins to your cookies (unless it dramatically increases the water content). You can add a bunch of macadamia nuts, peanut butter, chocolate or rainbow sprinkles, marshmallows, etc. If you want to add a slight tang, dried cranberries are the perfect choice.

Make Sure To Use Cold, Cubed Butter

One of the key traits of a Levain-style cookie is its large and tall size, coupled with a fudgy center.

The key to reaching this is to prevent spreading of the cookie while not incorporating too much air. For that, we use cold, cubed butter, and chilling the dough just before it’s baked.

You’ll need a hand-mixer for this one, because whisking cold butter with a hand-whisk is going to make you flip!

Other than that, cold butter helps to elevate crispness in the cookies. When you mix cold butter with the dough, instead of being fully incorporated, it gets broken into small pieces instead.

As a result, during baking, the steam released will create flaky layers.

White Chocolate, Cranberry & Strawberry NY Cookies

Yield: ~20 cookies 

Ingredients

Cookie Dough

  • 200g unsalted butter, cold
  • 150g brown sugar
  • 100g granulated sugar
  • 5g vanilla
  • 2 medium eggs (~55g each w/ shell)  
  • 190g all purpose flour
  • 155g cake flour
  • 1g corn flour
  • 3g baking soda
  • 4g salt
  • 100g dried cranberries
  • 150g white chocolate couverture
  • 14g freeze dried strawberries
  • 1x parchment paper 

Directions

Cookie Dough

  1. Cut the cold unsalted butter into cubes and put into a large mixing bowl. Using a mixer, cream/beat the butter until it’s smooth and no large chunks are visible. Scrape down your beaters if necessary. 
  2. Add in the granulated and brown sugar. Beat until creamy and well-combined with no visible bits of butter remaining, scraping down the sides periodically. Do not overbeat.
  3. Add in the vanilla and beat in the eggs one by one until the mixture is just well-combined after each addition.
  4. In a separate large bowl, sift together all purpose flour, cake flour, corn flour, baking soda, and salt. Mix to combine the dry ingredients. 
  5. In two additions, add these dry ingredients into your wet ingredients (from step 3) and fold them in gently until they are 80% incorporated. There will still be unmixed flour visible and the dough may seem a little dry.
  6. Add in the white chocolate and dried cranberries and fold them in until the mixture is well combined and there are no flour specks left. Do not overmix. 
  7. Cling wrap the bowl and freeze the dough for ~30 minutes before portioning.
  8. Divide the dough into 20 equal portions. It helps if you have a scale. Roughly mold each into a ball and place them onto a parchment-lined baking sheet. Freeze the cookie dough balls for about 1 hour. You may also freeze them overnight and bake them the next day.
  9. After freezing, transfer the cookie dough balls into an airtight container/ziploc bag, and arrange the cookies you’d like to bake on the baking tray lined with parchment, making sure to leave a 2-inch gap between each. 
  10. Thaw the cookies at room temperature for about 5 mins before baking. If the cookies have been frozen overnight, thaw the cookies for about 10 mins before baking.
  11. Bake for 4 mins on the middle rack, then increase the oven temperature to 210°C and continue baking on the top rack for 4 mins or until the surface of the cookies are completely cooked but their middles are still soft. 
  12. While the cookie is still hot and soft, break the freeze-dried strawberries into chunks and scatter them evenly on top of each cookie and gently press them against the cookie.
  13. You may press the cookies slightly to check for doneness. There should be a dry crust formed outside, but you’ll still feel that the cookies can be pressed in and are soft to the touch. Do not overbake. Meanwhile, you may prepare the next batch of cookies to be baked.

Enjoy baking and want to get better at it? We post new recipes and tips all the time! Stay tuned by joining our newsletter or follow us on Instagram @bakestarters.

Sign up for our free newsletter

Read Next: Easy, Sweet Strawberry Yoghurt Madeleines


Trying this recipe out? Make sure you hashtag #bakestarters on Instagram so we can see your wonderful creations!

Continue Reading

Focaccia With Garlic Confit & Rosemary

December 20, 2022

Christmas celebrations and delectable meals are almost a tradition in itself. Focaccia is one of many Christmas dishes that goes well with almost everything. Just like brioche bread, it can be sweet or savoury.

When it comes to enjoying focaccia bread, this versatile treat can be enjoyed with a variety of companions like soups, meat, vegetables, pasta, sausage, and any other dish. [Go straight to recipe]

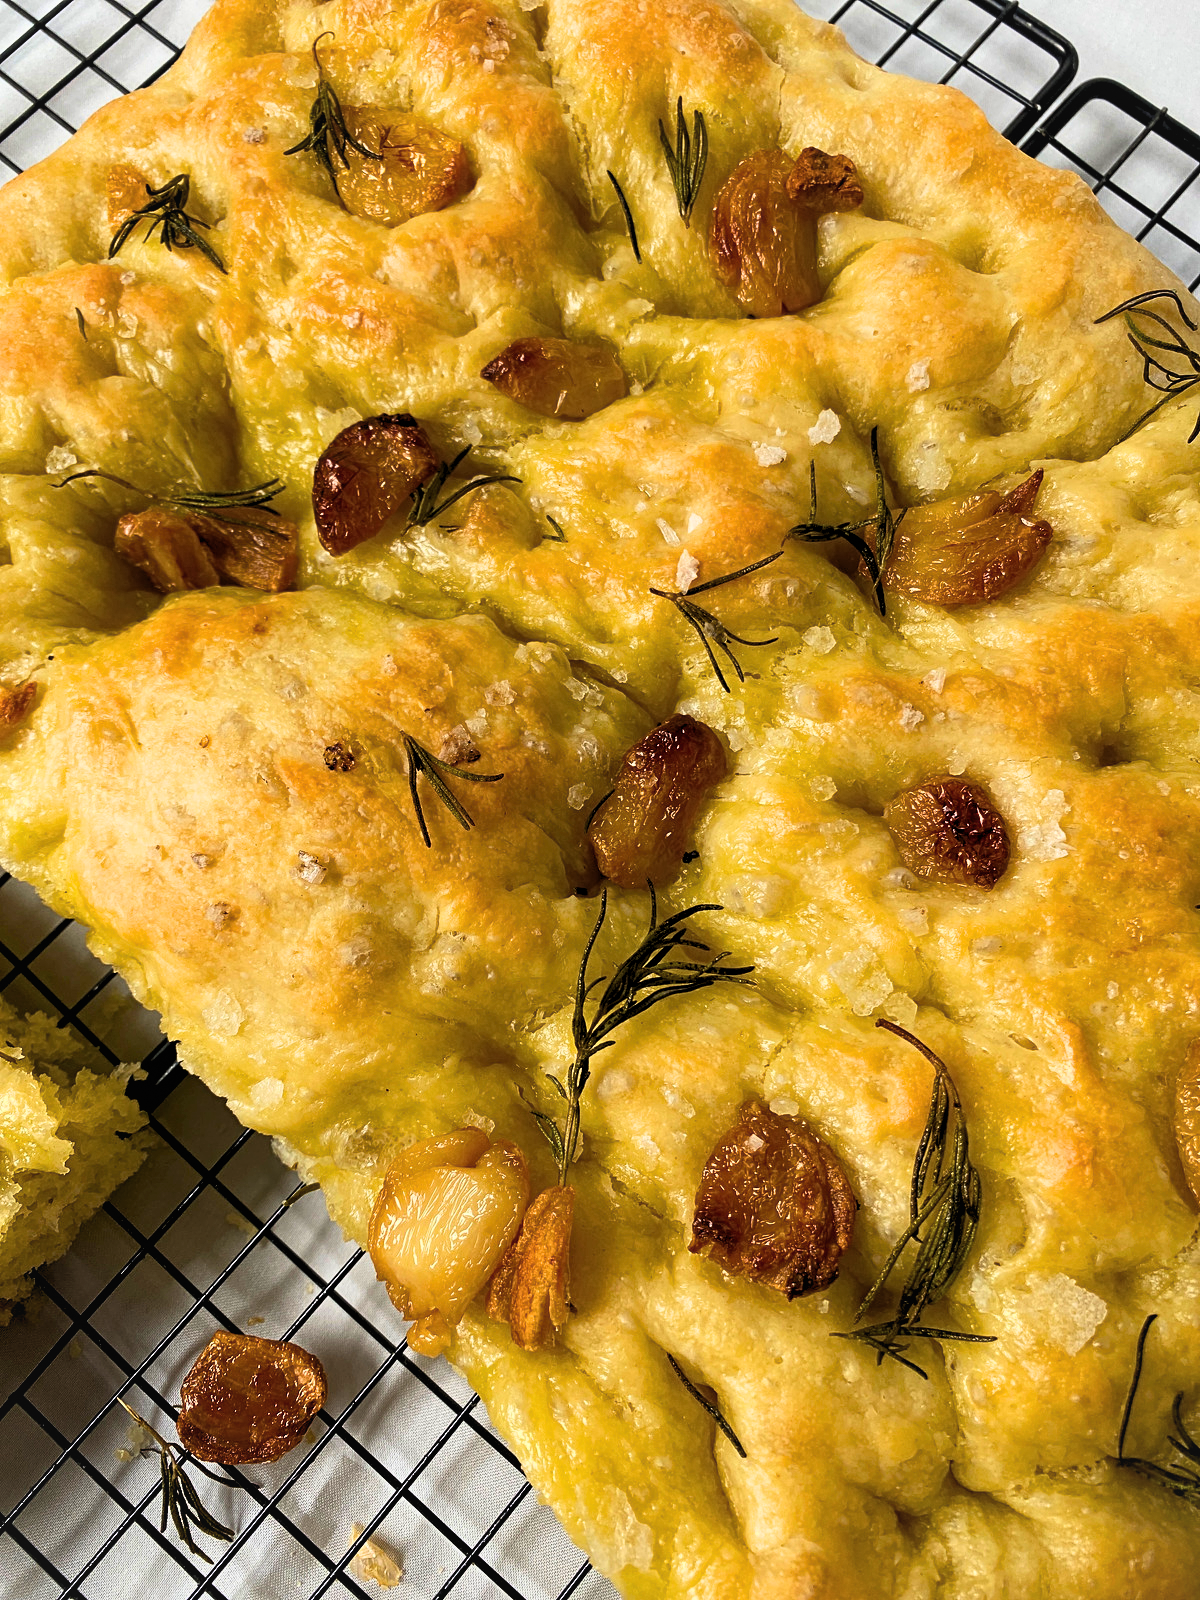
If you want to make this year’s Christmas more festive, we have an incredibly flavourful Focaccia With Garlic Confit And Rosemary recipe that could enliven your Christmas feast.

How To Dimple Focaccia

Dimpling focaccia

While most bread has a domed structure, it’s different for focaccia. Focaccia is known for its flat surface.

Even though it uses similar ingredients and techniques to regular bread, a focaccia recipe yields a delicious flatbread with a golden brown and crispy outside.

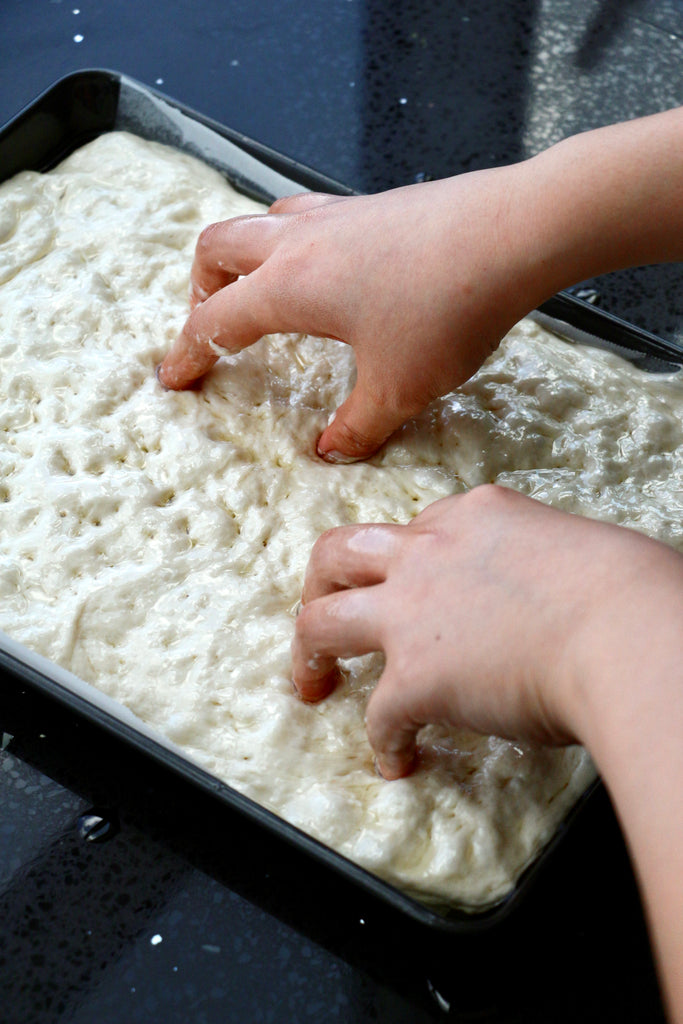
A focaccia's signature look is its dimples on the top. Those dimples are due to the “dimpling” process where the dough is gently pressed with fingers so that it creates little indentations.

These dimples aren’t simply for aesthetic purposes — they also have an important role in deflation reducing the air. When we want flatbread, it is important to keep the dough from rising.

One of the ways to prevent rising dough is by poking the dough with your fingers, so it forms dimples that will result in flatter bread when you bake it.

The ideal method to dimple your focaccia is first, you can drizzle olive oil all over the top or wet your fingers with it.

Then, gently push your fingers into the dough. Make sure you are not poking it all the way down as it will create leaks.

Dimpling your focaccia can also intensify the flavour of your focaccia since the olive oil is being pushed deeper into the dough.

Do I Need A Mixer For Making Focaccia?

Hand kneading focaccia

Kneading is the process in a focaccia bread recipe that allows the bread to have the perfect structure. It is a technique in making the dough come together, a technique which includes stretching and increasing the gluten contained in the dough.

If you want a quick and easy kneading process, an electric stand mixer will be immensely helpful.

However, kneading by hand is fun too! All you have to do is stretch, fold, and rotate your dough repeatedly until the dough becomes smooth and elastic..

For a complete step-by-step kneading of the dough with your bare hands, you can learn it here.

Hate kneading? Try This No Knead Cinnamon Nutmeg Raisin Bread.

Making Your Unique Focaccia

Focaccias can be adorned with different toppings and flavours to make your own unique bread.

If you want to satisfy your sweet tooth, you can top your focaccia with chocolate chips, maple syrup, dried berries, powdered or even granulated sugar.

Meanwhile, when it comes to making savoury focaccia, there are many more options.

The most famous of all is the garlic and cheese focaccia recipe which includes freshly baked focaccia bread topped with garlic, butter, herbs, and parsley. Here's one we made with rosemary and olives!

Rosemary Olive Focaccia


There are also other combinations, like rosemary potato, veggies focaccia, black olives, caramelised onion, broccoli, mozzarella sandwich, and our authentic Christmas focaccia: garlic confit and rosemary.

WATCH:

View this post on Instagram

A post shared by Bakestarters | Singapore (@bakestarters)


Focaccia with Garlic Confit and Rosemary

Yield: 30cm x 30cm pan / 10-12 servings

Ingredients

Garlic Confit

  • 3 heads of garlic
  • 100g extra virgin olive oil*

Focaccia Dough

  • 600g bread flour
  • 450ml warm water
  • 6g salt
  • 20g extra virgin olive oil*
  • 5g yeast
  • Extra olive oil for greasing the bowl

For Topping

  • Garlic confit** (see above)
  • Flaky salt
  • Fresh rosemary

Note:
*This can be replaced with any vegetable oil, but extra virgin olive oil will give the focaccia more intense flavors.
**You can infuse chili flakes into the garlic confit to add some heat to your focaccia.

Directions

Garlic Confit

  1. Preheat your oven to 150°C.
  2. Crush your garlic and remove the skin.
  3. In an oven-safe dish, submerge the garlic in olive oil. You may add in some rosemary, if desired. Roast in the oven for 30 - 45 minutes or until golden brown.
  4. You can also do this on a stove: In a saucepan, submerge the crushed garlic in 100g olive oil and let it simmer on low heat for 30 to 45 minutes. Occasionally remove the pan from heat to prevent it from boiling. Once the garlic has slightly browned, remove it from the heat and let it cool at room temperature.
  5. Set aside in an airtight container.
Notes:
  1. If you don’t want large chunks of garlic on your focaccia, slightly tear the garlic cloves into smaller bits after you remove it from the heat.
  2. If you are resting your focaccia dough overnight, transfer the garlic cloves into an airtight container after they’ve cooled down and store it in the fridge.

Focaccia Dough

  1. In a bowl, combine and stir yeast with 450g of warm water and let it bloom for about 5 minutes. This step is to make sure your yeast is active and alive. if it is, it should be foaming and bubbling by the first couple of minutes. While optional, instant yeast can benefit from this process too.
  2. In the mixing bowl of your stand mixer, add the bread flour and salt, and whisk the dry ingredients together to distribute evenly.
  3. Add the yeast mixture to the dry ingredients and mix using the dough hook attachment on low speed for around 5 minutes or until the liquid is well-incorporated with the dry ingredients.
  4. Once everything is well combined, increase the speed to medium and gradually add in the olive oil. Keep mixing for another 5 minutes or until the dough is not sticking to the side of your bowl. 
  5. Prepare a large bowl and generously grease it with olive oil.
  6. As the dough will be very sticky and slightly wet, grease your hand with oil before handling the dough, and transfer your dough into the greased bowl. Cover it with cling wrap or a damp towel and let it rest at room temperature for at least an hour or until doubled in size.
  7. Remove the plastic wrap and gently fold the dough from the corners to the inside by grabbing the sides of the dough. Rotate the bowl 180 degrees and repeat until you fold all sides of the dough.
  8. Gently stretch the dough to the edge of the pan — If you find the dough resisting, let it rest for 10-15 minutes before continuing. Cover it with plastic wrap and let it proof for 1 more hour.***

Baking

  1. Preheat your oven to 200°C ~20 minutes before it’s ready to bake.
  2. Prepare your baking pan and heavily grease it with olive oil. 
  3. Dimple your dough — at this step, you are going to create dimples in your dough by gently pushing your fingers into the dough. Make sure not to poke all the way through.
  4. Gently drizzle the garlic confit and the oil, and sprinkle some fresh rosemary and flaky sea salt on top of your focaccia.
  5. Bake in the middle rack of your oven for 20 - 25 minutes, or until it’s golden brown.
  6. Take the focaccia out of the oven and let it sit at room temperature for a couple of minutes. Transfer the baked focaccia to a cooling rack to prevent the bottom from getting soggy.

Storage/Serving notes: Lasts up to three days. Store it in an airtight container at room temperature. Can be served on its own or dipped in an olive oil and parmesan combo. This is also a great substitute to your regular sandwich bread.

Addtional notes***: At Step 8 of making the focaccia, you can let the dough rest up to 24 hours.

Instructions:  In the same greased bowl as before, shape your dough into a ball and cover your bowl using plastic wrap. Let your dough slowly rise in the fridge overnight or up to 24 hours; this will give your dough more time to ferment and, therefore, develop more structure and flavors. Make sure you grease your plastic wrap to prevent it from sticking to the dough. If doing this, store garlic confit in the fridge in an airtight container.

Loving our bread recipes? Sign up to our newsletter to get more bread recipes and tips and tricks on baking perfect loaves of bread!

Sign up for our free newsletter


Trying this recipe out? Make sure you hashtag #bakestarters on Instagram so we can see your wonderful creations!

Read Next: French Brioche With An Italian Twist: Ultra Soft Tiramisu Maritozzi

Continue Reading

Delightfully Tropical: Mango Coconut Mille Crepe Cake

December 15, 2022

Delightfully tropical.

Continue Reading

A Simple, Sweet & Earthy Hojicha Log Cake With Caramel Mousse

December 14, 2022

Isn’t it hard to resist the softness of a chiffon cake?

Typically, a Christmas log cake comes with chocolate or whipped cream.

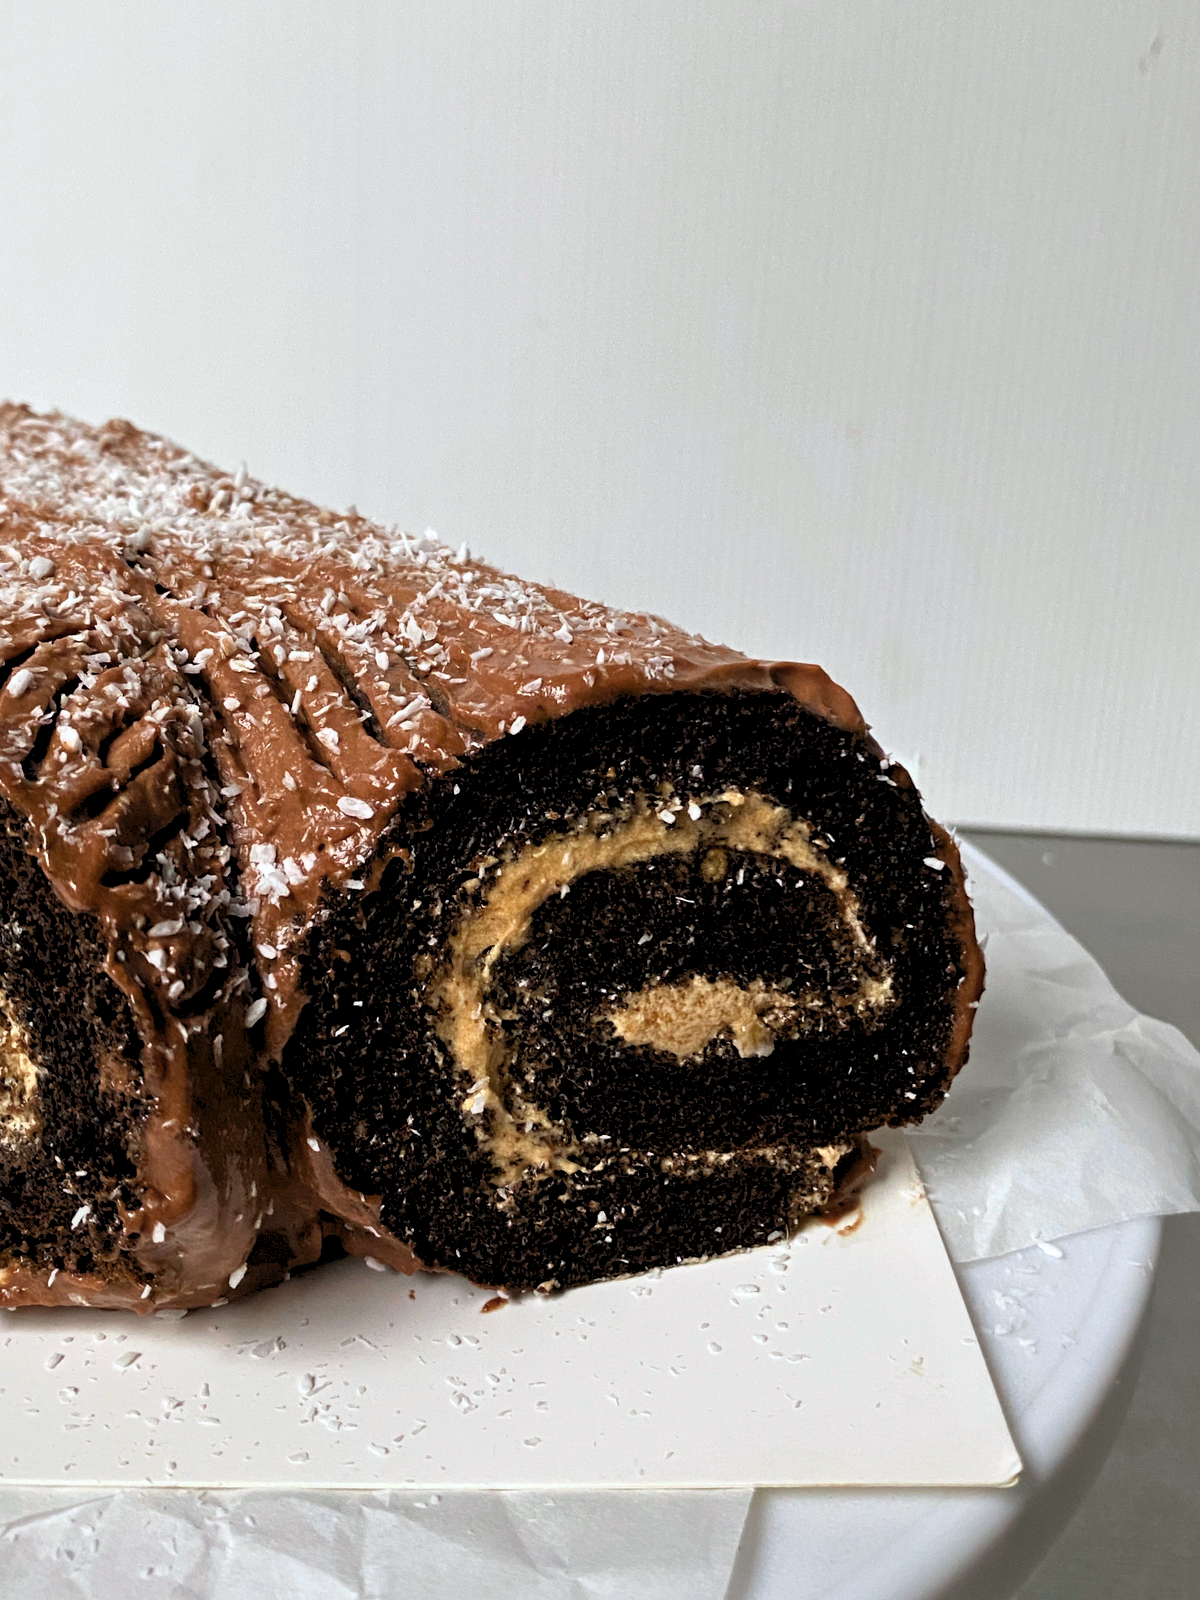
Here we have a special Swiss Roll recipe with a bittersweet kick, courtesy of hojicha and some smokiness from a caramel filling. [Go straight to recipe]


View this post on Instagram

A post shared by Bakestarters | Singapore (@bakestarters)

Starting With A Basic Fluffy Swiss Roll Recipe

Chocolate Yule Log

The base for this Hojicha Log Cake With Caramel Mousse is a pillowy swiss roll. If you already know how to make a Swiss Roll, yielding your desired log cake will be relatively simple.

Read More: Spill The Tea - Our Guide To Using Tea In Your Baking Recipes

If you are a beginner, read on.There are a few keys to a light and soft Swiss Roll.

The tenderness and lightness of a swiss roll cake comes from the cake flour and chemical leaveners. Cake flour has a smaller percentage of protein content which produces less gluten, so your cake will stay soft.

Another key part of making a Swiss Roll like this is in the use of an egg white meringue to provide air to your batter. This makes your Swiss Roll incredibly light and fluffy.

How To Make A Moist And Fluffy Chiffon Cake?

Instead of a sponge cake, we opted to use a chiffon cake for our Swiss Roll.

A Swiss Roll is all about the softness. The basic requirement of an ideal chiffon cake is one that is moist, light, and fluffy.

In every chiffon cake recipe, the first step is always to bring your ingredients to room temperature. However, since we will be using milk to dissolve the hojicha powder, we’ll warm the milk up instead.

Oil is used instead of butter in a chiffon cake to keep the cake moist and light. Whenever you want to make a cake less dry, oil is a good ingredient to bet on, primarily because it stays liquid at room temperature.

Use a vegetable oil that doesn’t impart strong flavours, such as canola!

Using a strong-flavoured oil like olive oil for baking is generally not recommended, due to the lower smoking point and the flavours it imparts to your baked goods.

Read More: 10 Cake Frosting Tips To Nail Your First Cake

Roll It While It’s Warm

The most important tip when rolling your swiss roll is that you have to roll your cake while it’s warm. For a much better result, this step needs to be done carefully.

Why does the cake have to be rolled while it’s still warm?

Rolling a sponge cake while it’s warm will spare you the disappointment from a cracked surface. When the cake is warm, it’s more malleable and thus, allows you to roll the cake without cracking.

Letting the cake cool in its rolled form will let it set in that shape, and when you finally put your fillings in, rolling it again without cracking will be far easier.

The Sweet, Earthy Hojicha Log Cake With Caramel Mousse

After diving into the world of a classic Swiss Roll, now it’s time for you to make one!

We took a bit of creative freedom with this by making it a hojicha log cake filled with a caramel mousse, then topped off with a whipped chocolate ganache.

Verdict? Absolutely divine!

Hojicha Log Cake With Caramel Mousse

Hojicha Log Cake

Yield: ~6x servings

Ingredients

Whipped Chocolate Ganache

  • 150ml heavy cream
  • 50g chocolate (54.5%) couverture

>Hojicha Chiffon

  • 20g hojicha powder
  • 30ml whole milk, warm
  • 25g vegetable oil
  • 3 medium eggs (~55g each with shell)
  • 50g cake flour
  • 2g baking soda
  • 10g cornstarch
  • 2g salt
  • 60g granulated sugar

Caramel Mousse

  • 50g sugar
  • 20ml water
  • 50ml heavy cream (for caramel)
  • 10g butter
  • 2g vanilla essence
  • 75ml heavy cream (for mousse)

Optional (for garnish)

  • 1 tbsp of desiccated coconut or confectioners' sugar

Directions

Making Whipped Dark Chocolate Ganache

  1. Add the dark chocolate couverture to a medium bowl.
  2. In a medium saucepan, heat heavy cream over medium heat until it simmers i.e. bubbles slightly — do not boil it.
  3. Remove heavy cream from heat and pour it over the dark chocolate couverture.
  4. Let it sit for 30 seconds, then mix the heavy cream and the chocolate couverture, using a spatula, until well combined.
  5. Once everything is well combined, cover the bowl with a cling wrap and let it chill in the fridge for 3-4 hours.

Making Hojicha Chiffon

  1. Except for the warm milk, bring all of your chiffon ingredients to room temperature.
  2. Preheat your oven to 180C.
  3. Combine hojicha powder, warm milk, and oil in a medium bowl. Then, whisk until no clumps of hojicha powder are visible. Set it aside.
  4. Separate the egg whites from the yolks.
  5. Using an electric mixer, on medium speed, beat the egg whites until it’s bubbly, and frothy. Once it foams, gradually add sugar — do not add everything at once, and continue to beat the egg on high speed until it reaches stiff peaks.
  6. Add the yolks to the egg whites meringue, and continue beating the mixture until it’s well combined.
  7. With a sieve, sift in cake flour, cornstarch, salt, and baking soda to the egg mixture. Carefully fold, using a rubber spatula, until it’s well combined. 
  8. Combine the egg mixture, and hojicha mixture by adding a quarter of your egg mixture to the hojicha mixture. Carefully fold, using a rubber spatula, until it’s combined. Then add the batter to the rest of the egg mixture, and carefully fold until it’s well incorporated. Do not overmix.
  9. Line your baking pan with parchment paper, and pour the batter into the pan. Even out the batter with a spatula, then give a few taps on your work surface to release any air bubbles inside the batter.
  10. Bake your chiffon, on the middle rack, for 10-12 minutes, or until a toothpick inserted in the center comes out clean.
  11. Once done, transfer your chiffon to a clean towel, and cover the top with parchment paper. 
  12. While it’s still warm, carefully roll your chiffon from the uppermost side to the bottom, and let it cool completely.

Making Caramel Mousse

  1. In a medium saucepan, combine your sugar, and water. 
  2. Cook the sugar and water mixture over medium heat, stirring constantly, until the color turns golden brown.
  3. Once the color has changed, remove the mixture from heat, and slowly add in 50ml heavy cream (make sure the heavy cream is at room temperature), and mix it until it’s well combined. Be careful as the caramel might splatter, and it is VERY hot.
  4. Next, add the butter and vanilla, and mix until well combined. Transfer the caramel to a bowl, and let it cool completely.
  5. In a large bowl, beat 70ml heavy cream, using an electric mixer on medium speed, until it reaches a soft peak. Add in the caramel and continue to whip the cream until it reaches a stiff peak.
  6. Set aside one tablespoon of the caramel mousse, and use the rest for the chiffon filling.

Assembling Your Yule Log Cake

  1. Once the cake has cooled down completely, carefully unroll your chiffon and place the parchment paper on the bottom of the swiss roll. Please note that the brown side of the cake should be facing up.
  2. Using a frosting knife, spread a thin layer of caramel mousse evenly on top, leaving a 1 cm gap around the edge of the chiffon. 
  3. Carefully roll the cake and make sure it is rolled as tightly as you can. This time, make sure that your parchment paper isn’t in between the cake.
  4. Twist and seal the ends of the parchment paper and wrap the rolled cake in cling wrap. Let it rest in the fridge for at least one hour.
  5. After 1 hour: Bring your ganache out and let rest for ~15 minutes, then whip the ganache using a hand electric mixer until it reaches a stiff peak.
  6. Trim the edges of the roll cake to get a clean look on the edges of the cake.
  7. Cut ¼ of the cake diagonally, then spread a thin layer of caramel mousse onto the short stumpand attach it to the side of the log cake. 
  8. Cover the log cake with chocolate ganache using a frosting knife, leaving the trimmed edges uncovered.
  9. OPTIONAL: Carefully sprinkle desiccated coconut or confectioners' sugar over the top of your log cake.
  10. Using a fork or a toothpick, draw bark lines along the top to the bottom of the log cake, and repeat until you cover all of the sides.
  11. Let it chill in the fridge for at least 30 minutes before serving. Enjoy!

Storage: Best served immediately. Can be stored in the fridge and in an airtight container, can last up to three days.

Read More: Guide To Soft, Medium, Firm, And Stiff Peaks

Trying this recipe out? Make sure you hashtag #bakestarters on Instagram so we can see your wonderful creations!

Continue Reading

French Brioche With An Italian Twist: Ultra Soft Tiramisu Maritozzi

December 06, 2022

Elevate your brioche game with this ultra soft and fluffy Tiramisu Maritozzi.

Continue Reading

Easy, Sweet Strawberry Yoghurt Madeleines

December 02, 2022

These easy madeleines are made with a simple but delightful twist.

Continue Reading

Umami White Chocolate Miso Japanese Cookies

November 30, 2022

Sometimes, we all need a little umami.

Continue Reading

RECIPE: Soft & Fluffy Milk Bread Loaf

November 25, 2022 8 Comments

This milk loaf is soft, fluffy, and slightly chewy with a subtle sweetness and milky fragrance. Get the recipe here!

Continue Reading

RECIPE: Get into the Summer Mood with These Eggless Lime Coconut Cupcakes!

December 17, 2020

These fluffy cupcakes are bursting with tropical flavours. Taste the refreshing pairing of lime and coconut in every bite! Whip up a batch, and grab one whenever you're in need of an instant mood boost.

Continue Reading

8 Alcohol Choices to Booze Up Your Tiramisus, Cakes and Baked Goods

December 11, 2020

A dash of alcohol can turn your innocent sweet treats into fun, boozy ones! We've rounded up 8 of our favourite drinks, along with the best recipes to use them in. Bring them to the dinner table, and watch everyone dig in with excitement.

Continue Reading

RECIPE: A Rich Chocolate Brownie Mousse Cake, Where Fudge Brownie Meets Silky Mousse and Shiny Chocolate Glaze

November 25, 2020

Rich and decadent, with three different forms of chocolate. This Chocolate Brownie Mousse Cake is the ultimate treat for all chocoholics out there! Prepare this ahead, and impress everyone at the table when the time for dessert comes.

Continue Reading

RECIPE: A Silky Smooth 5-Ingredient Crème Brûlée Anybody Can Make In <1 Hour

November 19, 2020

Crème Brûlée is deceptively easy to make. No one would expect that this impressive dessert only needs 5 ingredients and some simple steps! Finish off with a dramatic blow-torching action, and impress everyone at the dinner table.

Continue Reading

1 2 3 … 5 Next
More Links
  • Privacy Policy
  • Editorial
  • Bakeware
  • Delivery Information
Sign up for our newsletter

Sign up to get the latest on sales, new releases and more…

Our Mission

We help you go from stressful, to stress-free & therapeutic baking.


Country

© 2025 Bakestarters. Powered by Shopify

American Express Apple Pay Google Pay Mastercard Shop Pay Union Pay Visa